The Venerable 60mm Refractor. How to Build Your Own
Would you like a quality but inexpensive, quick setup, fast cool down, and sharp imaging telescope? If so, you might find it hard to put all of that together in one package. Fast cool down means either quite small, or a refractor. But a quality refractor is not generally that inexpensive. A good solution to the quandary is this DIY refractor project.
What is the classic design?
The classical refractor telescope used for astronomy has a long focus 2 element objective (front lens) made of Crown and Flint glass. The long focal length is used in conjunction with the achromatic (2 element) lens to reduce the chromatic dispersion caused by refractor optics. By making the focal long enough, color dispersion is reduced to a negligible level, making the instrument perfect for lunar, planetary, and general astronomical observing.
Chroma Ratio Table
| Dia mm | Dia in | 6.00 | 7.00 | 8.00 | 9.00 | 10.00 | 11.00 | 12.00 | 15.00 | 20.00 |
| 50.00 | 1.97 | 3.05 | 3.56 | 4.06 | 4.57 | 5.08 | 5.59 | 6.10 | 7.62 | 10.16 |
| 60.00 | 2.36 | 2.54 | 2.96 | 3.39 | 3.81 | 4.23 | 4.66 | 5.08 | 6.35 | 8.47 |
| 70.00 | 2.76 | 2.18 | 2.54 | 2.90 | 3.27 | 3.63 | 3.99 | 4.35 | 5.44 | 7.26 |
| 80.00 | 3.15 | 1.90 | 2.22 | 2.54 | 2.86 | 3.17 | 3.49 | 3.81 | 4.76 | 6.35 |
| 90.00 | 3.54 | 1.69 | 1.98 | 2.26 | 2.54 | 2.82 | 3.10 | 3.39 | 4.23 | 5.64 |
| 100.00 | 3.94 | 1.52 | 1.78 | 2.03 | 2.29 | 2.54 | 2.79 | 3.05 | 3.81 | 5.08 |
| 125.00 | 4.92 | 1.22 | 1.42 | 1.63 | 1.83 | 2.03 | 2.24 | 2.44 | 3.05 | 4.06 |
| 150.00 | 5.91 | 1.02 | 1.19 | 1.35 | 1.52 | 1.69 | 1.86 | 2.03 | 2.54 | 3.39 |
Aqua cells indicate Conrady (5) criteria reached
Color dispersion, or chromatic distortion, refers to the characteristic spreading of light colors caused by prisms and lenses. If you view the bright limb of the moon with a poor lens or a short focus refractor, likely you'll see not the bright curve of the moon's limb with a black background, but rather a bright limb that is bleeding a thin ring of colors, yellow, red, and blue. The dominance of colors is determined by the particular focus setting of the telescope.
This is caused by the color spreading characteristic of the objective lens (or lenses). Since the colors are spread slightly by the objective, all colors do not come to focus at the same point. So at any particular focus setting, a narrow band of colors is properly focused, and the colors further away in the spectrum are slightly out of focus, leading to the halo of colors visible whenever viewing a bright target, like the limb of the moon. It has the effect of softening the details of the image, in that always some colors are out of focus as others are in focus.
Long ago telescope makers learned to make an Achromatic Lens, telescope objectives made out of two lenses back to back, each out of a different type of glass, decreased this unwanted color dispersion. Crown and Flint glass has been and is still a common choice of glass types, though newer types of glass with less color spreading characteristics are now used on shorter focus telescopes.
These newer refractors are called ED telescopes, for extra-low dispersion. Using two lenses together allows telescope makers to bring some of the color spread under better control, greatly reducing the problem. The classical crown and flint lenses work good in larger focal ratios (long focus), and the new ED refractors can work at focal ratios perhaps half of what classic refractors require.
So a long focus refractor, even using the older and less expensive Crown and Flint glasses, will produces images with virtually no noticeable color dispersion. The result, no halo of colors around bright objects, and sharper images. The classic refractor telescope of moderate diameter has been a refractor with an f/15 focal ratio or longer. That means that the focal length of the telescope is 15 times the diameter of the telescope.
The bigger the diameter of a telescope objective, the bigger the focal ratio must be to achieve good color correction. Referencing the Chromatic Aberration chart you can see that a classic design 60mm of f/7 or greater meets the Sidgwick (3 ratio) standard of color dispersion. A very common focal length for 60mm telescopes is 700mm, which gives a focal ratio of about 11.7, and divided by telescope diameter gives a chroma index of over 3. For both 60mm and 70mm telescopes, a ratio of f/12 or better will deliver nearly chromatic-error free images, meeting even the Conrady (5 ratio) standard.
The telescope you see above is a 60mm diameter instrument of 1000mm focal length, having a focal ratio of f/16.7, and a chromatic aberration ratio of 6.9. Plenty long to have the depth of field necessary to eliminate color dispersion. It's hard to find such long focus telescopes in today's market. The closest complete telescope I've found comparable to the one shown here is the Celestron 21062 AstroMaster 70 EQ Refractor Telescope
The 60mm telescope I constructed from parts is mounted on my DIY Pipe Tripod. The homemade pipe tripod is inexpensive and easy to make, and in my case is used to hold any one of several different instruments, including any of three other refractors or my Meade ETX90. You can save some time and still end up with a super setup by just building your telescope and purchasing the Celestron Heavy-Duty Altazimuth Tripod
But as you might guess, I not only love astronomy and telescopes, I also like to tinker. I'm kind of a low level amateur ATM (Amateur Telescope Maker). If you love the astronomy and telescope part, but not so much the tinker part, something like a ready made telescope on a computerized mount (at a reasonable price) might be your cup of tea, like the Celestron 80LCM Computerized Telescope

It shows the tube (eyepiece end in this image), the focuser, the finder scope, and the telescope objective. That's about it. And if you get compatible parts, about all you have to do is drill a few holes and screw the parts together.
I purchased all of the parts for this telescope except the focuser from a store that existed on the Cloudy Nights Forum. At last check, the Cloudy Nights store didn't seem available anymore, so you'll likely have to find a good objective somewhere else.
I got the focuser from Meridian Telescopes, another source that seems to have dried up. The entire telescope project cost me only about $120. The heart of the telescope is the object lens, which is a Japanese one of fine quality made by the Carton company. Other sites to check out for inexpensive telescope project parts are the SurpluShed and Ebay.
By compatible parts, I mean that in the example given, the telescope tube was already the proper length, was threaded to accept the objective cell, and already had a baffle in the tube to limit stray light. The objective lens was already mounted in the cell. The focuser already properly fit the inside diameter of the tube. I only had to drill holes to accommodate the focuser and the finder scope.
If you must collect parts from different sources, then you'll need to be sure of a few measurements. Be sure the lens cell fits the tube you purchase. Be sure the focuser and finder mount fit the telescope tube size. Also, carefully measure the focal length of the of the objective and be sure to cut the telescope tube at a length that properly brings the image to focus within the focuser travel range.
If you must cut a tube, it's important to cut it as square as possible. Wrap a 2 inch or wider strip of paper around a tube where you want to cut, making sure the ends of the paper overlap perfectly. With this strip of paper taped into place with a bit of masking tape, use the edge of paper as a guide to draw a line around the telescope. This will ensure that the traced line is in fact square with the length of the tube. Then carefully cut along the line. Cut just through the line, and rotate to an adjacent portion of the line to continue cutting. A bit of finish up filing should leave you with a near perfect, square cut.
Also, if your telescope tube has no baffles already in it, you'll need to add a couple of those. This FAQ on Refractor Baffles can help answer your questions on positioning baffles.
Add Just A Bit Of Improvising

I was able to find an empty plastic soap bottle that was just bigger than the diameter of my telescope. I cut off the neck end, and cut a hole in the bottom to just accommodate the threads on the objective cell.
I then sprayed the inside and outside of the bottle with flat black paint and screwed it onto the front of my telescope. It has made a fine lens hood, cost nothing, and took little effort. What do you get for all of this work? Mainly you get a solid telescope with good optics that will last for years.
If You Can't Find Good 60mm Telescope Parts
Many off the shelf modern telescopes have a lot of plastic parts, like plastic focusers, and/or plastic lens cells. Some even have plastic lenses. By purchasing quality parts, you can approach the off the shelf cheap telescopes and end up with a solid performer with all sturdy components. Another option, maybe an even better one, is to find a vintage Japanese 60mm telescope on EBay, such as a 60mm Monolux that I obtained from an on line acquaintance. Then you can used some of the information on this page and on the Monolux page as a starting point and improve your used purchase to make a super performer. How I did the improvements is described on the Monolux reference above.As to new telescopes, I've heard good reviews for the long focus 60mm telescopes from Celestron, like the Celestron 21043 60mm Equatorial PowerSeeker Telescope
Another option is to go just a bit larger and consider the Vixen 2602 A70Lf Telescope
At the low price of the Vixen, it does not come with a tripod, but does come with a dove tail to fit a standard Vixen mount. A same sized Vixen telescope complete with mount is the Vixen Space Eye 70 Refractor Telescope, 70
A Simple Method Of Attaching The Telescope

The street L shown has polished and lubricated threads and makes the azimuth and elevation bearings for the simple tripod.

In this image, you can also see the simple method of attaching the telescope to the v-block unit. A hose clamp has a 1/4 inch hole drilled into it. A screw goes through the clamp and protrudes through the plywood. The clamp goes around the telescope. A wing nut on the end of the 1/4 inch screw draws the telescope tightly into the v-blocks.
By testing balance with the star diagonal and eyepiece in place, I can find the perfect balance point and then tighten the hose clamp in place. In this way, unscrewing a single wing nut lets me remove this telescope and mount a different one, each having a hose clamp at its respective balance point. Tighten the wing nut, and I'm instantly ready to go with a different telescope.
Pointing The Telescope

To use the circles, I must level the tripod. By that I mean the when pointing both North/South and East/West, the telescope should be level when at elevation zero. I place a small level on the telescope to make this adjustment, placing shims under the telescope legs to get the level readings.
Then I point the telescope at Polaris, at which point I set the azimuth ring to read zero. At that point my telescope is aligned, and my Xephem planetarium program can be used to tell me the current azimuth and elevation of any desired target.

In this example, I left-clicked on an object of interest in the displayed star chart (re-sized smaller for this example). This caused current positional information for the object to be displayed in the upper-right corner, including the object's azimuth and elevation (altitude). I've expanded that portion of the display in the blowup. By using the Az and Alt numbers, I can point my telescope to an object using Altazimuth setting circles. Other computer planetarium programs, such as Stellarium and Kstars can also display azimuth and elevation coordinate numbers.
The Ultimate Pointing Aid
I think a much better aid to help in pointing my telescope is to use the web Star Pointer utility. It's available for you too, freely and conveniently. Just grab your smart phone, laptop, or Chromebook, and go to the Star Pointer post. There you can select objects from either the Messier, Caldwell, or Herschel 400 target lists, and get updated pointing coordinates to all targets in the selected list. You can choose altazimuth or equatorial coordinates, and the equatorial coordinates (which provide an alignment procedure) will present adjusted RA coordinates throughout the night in order to account for earth's rotation since alignment.
If you allow it to do so, the Starpointer utility saves your location in a cookie so it will be available automatically on your next visit. That's assuming that you observe from the same location next time. So with Star Pointer, you don't need charts, just a smart phone and your telescope (with setting circles). It's all I use now -- try it.
But Is All The Effort Worth It For A 60mm Telescope
I'd have to say -- absolutely. I'm in my retirement years now -- that's right -- I'm a Stargeezer, as this humorous t-shirt design suggests. And after years of lugging bigger telescopes around the yard, I have to say that the incredible simplicity of using a quality 60mm to 70mm refractor on a solid mount has given me hours of enjoyment.I've even been able to grab some pretty nice lunar and Jupiter photos through my DIY 60mm telescope. You can see examples further down in this post.
Certainly there are those (I was one) who recommend something like a 6 inch Dobsonian telescope as a first telescope. The reasoning is that a 6 inch aperture is enough to see a wealth of targets quite well, yet a 6 inch Newtonian is not an expensive telescope. Newtonian telescopes have long been considered the most bang for the buck, telescope-wise. And over the years I've certainly owned my share of Newtonian telescopes, with a 6 inch one in my current arsenal.
In fact, I started out in astronomy some 50+ years ago with Newtonian telescopes. Like most youngsters at that time, I'd read that one needs at least a 3 inch refractor or 6 inch reflector to do serious work, and I could get a 6 inch reflector for about the money of a 3 inch refractor. So in those days, I never tried a refractor of quality -- of any size.
But as I've grown older, I've found that convenience is moving up in priority as an observing criteria. If my telescope isn't convenient, it doesn't get used much. And it's been said many times that a big telescope that is rarely used isn't as good as a smaller one that does get used. So, I've started working with a couple of nice 60mm refractors to see if I'd been missing anything, the one described on this post and a refurbished Monolux 60mm that was brought back from near death. The Monolux, fastened to the pipe fitting mount, is shown below.

Photos Through My 60mm Telescope
The following photographs were all taken through the 60mm telescope described on this page. Most were taken just by holding my digital camera to the eyepiece. Some were taken with a Celestron NexImage web cam.
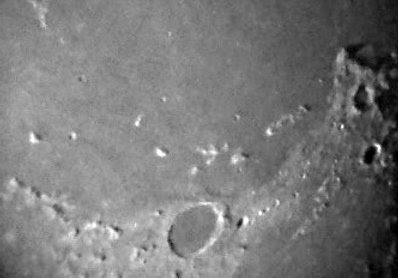


At the time of this writing, Saturn's rings are viewed nearly edge-on, so I've not been able to try seeing the Cassini division, so hopefully I have a treat still in store.
As to stars, refractors of this size give the nicest views of double stars that I've seen. Yes, on nights of very good seeing my bigger reflectors can separate closer doubles, but even then the reflectors' don't give the crisp, satisfying images that the refractors do.
Open clusters are easy and enjoyable to see with a 60mm, and unlike my f/5 Newtonian, stars are crisp and pinpoint right to the edge of the field of view. Globular clusters are easily visible in my 60mm telescopes, but most can't be resolved beyond a fuzzy image.
I was surprised to see how well some nebula can be observed with 60mm telescopes. I was able to find the Ring nebula (M 57) even when a quarter moon was out. And on dark nights I can make out the faint Crab nebula. Those views have whetted my appetite for more star and nebula targets.
Simplicity And Convenience
So why not just use a bigger telescope instead of trying to squeeze performance out of a lowly 60mm?For me it's similar to the reason I liked the QRP low-powered equipment when I was into ham radio. Then, it was easy to sit at a microphone in Denver with a several-hundred watt unit and chat with a fellow in Florida, but seemed more satisfying to have done it with a telegraph key and a mere 500 milliwatts of power. My skill at using the low power rig added to the challenge, and the ultimate enjoyment.
That's what I'm experiencing now in astronomy, with 60mm and 70mm refractors. Sure I can find and see targets easier with my 6 inch reflectors. But they are more of a hassle to set up, and must cool down for at least 45 minutes before they can deliver good views. My f/5 Newtonian on its equatorial mount is often sitting at an odd angle for observing, so I have to loosen bolts and rotate the telescope in its cradle to find a more comfortable position.
But my 60mm refractors (whichever one I'm using) sit mounted on my simple but sturdy Altazimuth pipe tripod ready to go to work. They provide quality images with just minutes of cooling. With the simple Altazimuth mount, the finder and telescope eyepiece are always in comfortable positions as I move from target to target. Putting up the equipment is a snap -- just put the tripod back in the shed and cover the lenses. Done.
For casual observing, nothing could be simpler or more convenient.
One final thought.
A small telescope in dark skies can often trump a bigger telescope in light polluted skies. It's easy to see from one to two more magnitudes of stars in dark skies versus one's backyard. At a two magnitude difference in darkness of skies, a 60mm in dark skies can see as well as a 6 inch in light-polluted skies. At a one magnitude difference in sky quality, a 60mm in dark skies can see as well as about a 90mm in light-polluted skies.
Add to that the plethora of techniques for pushing your observing limit. For example, be sure your eyes are dark adapted. Use the appropriate magnification for the target. Be sure your lenses are clean, and position the telescope behind anything that can block off a troublesome light source. Practice using averted vision, you'll be amazed at the targets you can see with that technique.
I've found I can pick up a magnitude just by using my left eye rather than my right. That's right, using my left eye picks up a magnitude over using my right eye.
How? Easy, I had cataract surgery on my left eye, and it no longer has decades of aged dimming to filter the view.
As one fellow that also belongs to an astronomy e-club that I frequent put it, you can put your money into a bigger telescope, or use a quality 60mm or 70mm refractor and put you money into gas to get to a darker site.
In any event, if you haven't bought a telescope yet and aren't sure if you want to learn about aligning and cleaning mirrors, consider starting with a good 60mm to 70mm telescope. Or, if you want to challenge your skills, try DSO hunting with a good 60mm or 70mm. Your sense of satisfaction at finding objects with such modest equipment will surprise you.
No comments:
Post a Comment