The NexStar 5SE, a Review
Below you see the SCT part of my Astro-Weapon Arsenal: a
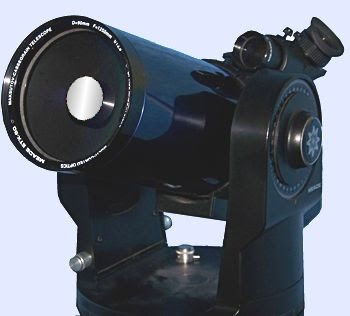
Celestron NexStar 5 SE Telescope.
I obtained the used Celestron from an egroup acquaintence.

The used purchase included the sturdy tripod it comes with. You can see the hand controller attached to the side of the NexStar telescope mount. The controller easily lifts off of the mount for convenient user access.
The NexStar telescope in the above image is shown in the alt-azimuth mode. In this mode, the internal computer uses both azimuth and elevation motors to keep the telescope pointed at any selected object.

Telescope alignment and telescope movements are done with the hand controller, shown above. The controller has a number of alignment procedures from which you can choose to obtain alignment, and once aligned, you can just select a target with the hand controller and the telescope will move to the target. On this model, a bubble level was provided for leveling the tripod. The previous owner affixed the bubble level to the accessory tray. It seems quite sufficient for leveling the tripod.
I haven't used all of the NexStar alignment methods yet, but I've found that one called the Auto Two Star Align works very nicely. The Auto Two Star Align requires you to align on known stars that you pick from a list using the controller. You must be sure that you point the telescope to the stars that you selected.
There is an Auto Align which lets you just pick any 3 bright objects, without knowledge of what they are. You can even align on a single target, like the moon or a planet, but if you use this method the mount must be well leveled.
Normally I use the 2 star alignment, but on a few occasions I've gone
out to view Jupiter before stars were visible, so I clearly couldn't use any
star alignment procedure. So I used the solar system alignment option where
you can pick any planet, the moon, or the sun (with proper filter) on
which to align. Again, since this is a single target align, leveling the tripod
first is important. Using this option I was able to select Jupiter for the
alignment, and then view it with full tracking. While this technique is sufficient for viewing an early evening object, there will be more field of view drifting than with multi-target alignment procedures.
There are left/right/up/down buttons for slewing the telescope. The rate can
be adjusted by pushing the RATE button at lower right, followed by a
single digit key, 1 being slowest and 9 being fastest. There are some handy
target keys to make target selection easy. The 1/M key is used to select
a Messier target. The 2/CALD key is for selecting a Caldwell target. The
4/NGC key is for selecting a target by its NGC number. The 7/STAR
key is for selecting a star by SAO number. The LIST key has many
named
targets in the list, like named stars, double stars, and variable
stars .
To be honest, I've had to do some web searching to learn about some aspects
of the telescope that I thought were kind of glossed over in the NexStar
manual. If you have one of these telescopes or are thinking about getting one,
you might want to consider the
The NexStar User’s Guide (The Patrick Moore Practical Astronomy Series).
It may well help short circuit most of those web
searches for helpful tidbits of information. The NexStar 5 SE is a wonderful
telescope, based on the legendary quality optics of the Celestron 5 inch SCT.
But with the computerized mount, it may be quite different than you're used to.
It was for me. And a guide like this may be well worth the small cost.
In case you wonder if you can see anything with the NexStar 5SE, watch the video above. It's a movie of Mars taken through the NexStar 5SE using a Celestron NexImage astrocamera. You can certainly see the effects of seeing on the image, but you also can get glimpses of pretty nice detail at times. This Mars video was recorded in the summer of 2016 when Mars was at about an 18 arc-second size. That's a medium angular size for Mars, which at optimal oppositions can reach about 25 arc-seconds. A processed image making use of the best frames is shown below:

How Is The NexStar Like - And Not Like - My ETX 90?

My only previous experience with a Cassegrain telescope was with my Meade ETX 90, shown above. It is the old ETX model, with no computer enhancement, just a simple clock drive motor in the base. I usually use it on a solid DIY pipe tripod, but the ETX is shown here with its table-top legs.
At first glance, the NexStar and ETX telescopes (aside from color) look similar, with very short barrels and an eyepiece at the rear. But they are different in many ways. The Meade ETX 90 is a Maksutov Cassegrain which uses all spherical optics, and has a thick, meniscus corrector lens on the front. It has a built-in star-diagonal mirror to allow the eyepiece to be placed in a port that is conveniently placed for viewing. The mirror can be flipped out of the way allowing the image to be viewed from a rear (camera) port. Flipping the mirror can alternate from viewing to camera, a nice convenience when attempting astro-photography.
The Celestron NexStar is a Schmidt Cassegrain (often called an SCT), which uses a spherical primary mirror and a nearly flat looking aspheric corrector plate. It has no built-in star diagonal, but uses a conventional star-diagonal inserted into the rear of the telescope. And, of course, the NexStar 5SE is a five inch diameter telescope, while the ETX 90 is a 3.5 inch.

Above you can see the NexStar 5SE from a different view. Here you can see the corrector plate and the secondary mirror support attached to the corrector plate. The f/10 optical system of the NexStar has a secondary that is fairly large, about 40% the diameter of the primary.
In this image you can also see the large knob, protruding down from the elevation axis, that attaches the telescope to the mount. A few turns of this and the telescope easily un-mounts. The telescope has a mounting rail along its side that slides into position on the single-arm mount.
I can attest, by the way, to the handiness of the single-arm mount of the NexStar. My ETX 90, as shown in its image, has a fork mount. The mount is quite sturdy, but when I want to view something to the north, the telescope must be tipped back to view near north targets. This puts the eyepiece on the bottom of the scope where it is very inconveniently positioned for viewing.
The alt-azimuth mode of the NexStar single-arm mount points as easily and comfortably north as it does in any other direction. Far more usable than the ETX fork mount, or any equatorial fork mount. The tripod and single-arm mount of the NexStar seem quite sturdy, and I only have one criticism. When I touch the focus knob, it introduces a bit of vibration, so I have to make small adjustments and take my hand off to see the effect. But the vibrations damp quickly, and when tracking the image is perfectly steady.

Placing Celestron
Vibration Suppression Pads beneath each of the tripod legs helps with the
vibration issue. The above image shows the construction of the suppression
pads. A non-rigid suppression material is sandwiched between a hard cup (that holds the tripod foot) and a hard base.

Above you see how the tripod foot sits in the tapered cup. With one under each tripod foot, vibrations settle down in about half the time. While touching the focuser still causes a bit of vibration, the vibrations die off virtually instantly when the vibration suppression pads are in place. I use them all the time.
Adjusting To A Computerized Telescope
I've had to adjust to the idea of a computer controlled telescope. After some 50+ years of observing with manually positioned telescopes, I've taken some time to warm up to a computer controlled instrument. In the past I often used a programmable calculator that held a program to aid in pointing my setting-circle equipped telescopes. And being manually moved, each can be quickly and easily moved from position to position.

Star Pointer Utility
After having pretty much debugged my calculator pointing program, I made an on line version, available at Star Pointer. It is handy in that it will run even in a browser on a cell phone, giving access to alt-az or equatorial coordinates to stars in any one of 3 star catalogs.
But the NexStar must be moved from target to target either with the up/down left/right keys of the hand controller, or by selecting a target with the controller. If the telescope is initially pointing a long way from the desired position of the target, I must be patient as the motors whir to the new position.
The motors have several speeds however, and at max slewing speed only a few (or few tens) of seconds get the telescope to a new position even if far from the previous one. I've found that if I've correctly entered my position and time into the controller, the NexStar 5SE is very good at landing on selected targets. I may be able to move my other telescopes quickly by hand, but even with calculator or web utility assist I sometimes have to do a bit of searching to find my target. Usually that's because I sometimes misread the setting circles. Misreading setting circles is not a problem with the NexStar, as the computer does that for you.
Even though the NexStar has its own internal computer and tables of objects, I've found the StarPointer utility to still be of value. You might ask "Why? The telescope's computer already knows the stars' positions."
And you'd be right. But, if I just haphazardly scribble down a list of targets and go select them in turn with the hand controller, often the telescope has to move to quite a different direction to get from a current target to a new one.
Star Pointer circumvents all of that inefficiency. Star Pointer presents all of the currently visible objects of whichever catalog is selected in Azimuth order, starting with the Southwest. By entering objects into the NexStar hand controller in Star Pointer order, each target is usually only a few degrees from the previous one. So for one, I don't even need to use a star chart or computer planetarium to plan my evening, as the Star Pointer utility immediately shows what's up for any selected catalog. Plus, the order the objects are displayed is quite optimal for entering into the NexStar.
So with Star Pointer's help, the NexStar 5SE smoothly and quickly gets from one target to the next, saving a lot of time. It makes working with the computer driven mount less frustrating, as I can see many objects in an evening with little waiting for the telescope to move to the next object. I suspect I'd find this technique to be of value when using any computer guided telescope as a way of improving the viewing efficiency of each observing session.
You Can Easily Align The NexStar Secondary

The previous owner of my NexStar replaced the stock secondary alignment screws with handy thumb knobs for collimating the secondary, as shown above. These handy collimation screws are made by Bobs Knobs. I'm not sure where to get them at this time, but they definitely make collimation easier. A snap, in fact.

I consider the ability to tweak the collimation of the NexStar a real plus. And with the knobs, it takes only a few minutes to swing over to a bright star, defocus, and get the collimation to near perfect. The above illustration shows a depiction of what you see with an out of focus, misaligned star image. You see a series of rings (Newton's rings). If the optics aren't in alignment, then the rings aren't concentric, but skewed to one side. To align, you use the 3 secondary alignment screws to bring the rings into a concentric appearance.
It's much easier than collimating my Newtonian. And don't worry, the NexStar 5SE seldom needs tweaking, unless you handle it roughly when moving to/from your observing site.
For comparison, above you can see an image of the front end of my ETX 90 Maksutov. The secondary on the Maksutov is just a silvered spot on the back of the corrector plate. As the ETX is an f/13.8 system, the secondary is a bit smaller by proportion to the NexStar, being a bit over 30% the size of the primary. But you'll notice no knobs or screws of any kind associated with the secondary. The only way to adjust the collimation of the Maksutov is to pull off the entire back of the telescope and fiddle with the collimation of the primary itself -- and no, I've not done that nor do I intend to. As to that, however, the Maksutov design of the ETX rarely needs collimation.
You may notice, in the first ETX 90 image, that the fork mount is tilted. My older model ETX, with only a single motor in the base, must be in equatorial mode for the clock drive to work. The NexStar, with two motors, operates perfectly well, and more conveniently, in alt-azimuth mode. But, if I want to take long exposure (several minutes) astro photographs with the NexStar, I must be able to use the NexStar in equatorial mode.
For Astrophotography, The NexStar Goes Equatorial

Above you see the NexStar 5SE in equatorial mode. Notice that the entire single arm mount is tilted, and at left there is a rod that extends and locks in place to accommodate any Latitude. The base doesn't happen to rotate to help in north or south alignment (you have to move the tripod), but adjusting for Latitude is rather easy. The NexStar controller has a equatorial alignment mode, and the telescope can operate in the equatorial position. While the drive isn't accurate enough to take unguided long exposures, it is quite possible to take a sequence of shorter photos and stack them.
Can You Do Astro-photography In Alt-Az Mode?
The short answer is yes, but with qualifications. The telescope is most native in its altazimuth mode, and alignment in this mode is rather easy. In this mode, however, as the telescope tracks with its two motors, the field of view rotates. The rotational rate depends upon the users latitude, and the azimuth and elevation of the target. Exposures in this mode must be short, perhaps 20 to 40 seconds, with the dependencies in mind.

Above you see what field rotation amounts to. This is a plot of field rotation rate (arc-seconds per second) at about 32 degrees latitude. The horizontal axis is azimuth, from 0 to 360. The vertical axis is elevation. The legend is across the top of the plot, showing the colors of the curves for each elevation. As you can see, the field rotation is fairly negligible when pointing the telescope predominantly in the east/west direction, when most of the telescope tracking motion is in elevation only. But when point near vertical or towards the north or south, the motion of the telescope in tracking is in azimuth, and this is where field rotation is a problem.
Still, it is possible to photograph solar system objects with this chart in mind. Below is a May 2016 image of Mars near the peak of the 2016 opposition. It was taken using the NexStar in Alt-Az mode, with a 2.5x Barlow projecting into a Celestron NexImage web cam. The resulting image is a stack of about 60 images (frames from a movie).

During the 2016 opposition, Mars was about 18 arc-seconds in apparent size.
When I first processed this image with my home-grown stacker program, I was
disappointed. It seemed that only darkening at the poles was visible. But I
noticed that the smudges
, one just above the other near the center of
the image, showed in most processed pictures. In fact, the top smudge is the
Granicus Valles region, and the bottom is the Phylegra Dorsa
region, the two bracketing the great volcano far too small be captured by the
NexStar, Ellysium Mons. Actually details themselves subtle enough that
they are difficult to see, but the NexStar picked them up.
Below you see the same image with some reference labels for the captured features:

Another effort the same night in May, 2016 was Jupiter, and as luck would have it, the GRS was visible. Below is that effort. As with the Mars effort, at first examination I was a bit disappointed, but I did see that some structure was visible in the SEB just next to the GRS. Hopefully, my next effort will do better. I realize now that I should have boosted the magnification as high as practical in order to get the most detail. As with the Mars effort, the Jupiter image was produced with around 60 stacked frames.

On the moon, the views through the NexStar 5SE are stupendous. You can use
the following image of the Lunar Apennines mountains as a guide. This image was
taken in June of 2016 through the NexStar 5Se using the NexImage camera. This image is the stack of about 100 frames. Talk about lunar details. You can see
more images taken with the NexStar 5SE at
NexStar 5SE Astrophotos. If viewing this on a desktop or laptop, trying loading just the image in a new tab where it can be blown up. On a mobile device, try just tapping the image so you can expand it.

As was shown with the Mars youtube earlier, seeing definitely causes a lot of variability in the quality of an observed image through a telescope. Below is another video that illustrates the point, a view of the Lunar Apennines region through the NexStar 5SE. This is why to produce images like that above you have to use an image stacking program to align and average images together to try to get an optimal image.
As the title of this section says, these pics were taken with the telescope in Alt-Az mode. It appears that if you keep to exposures of 30 seconds or less (or movies that extend 30 seconds or less), you can get pretty nice planetary images if you stack frames. The NexImage astro-camera, which is a fairly typical web camera conversion, takes 10 frames per second. So 30 seconds or so gives a few hundred frames to work with. Figure on stacking 30 or more frames (up to 200 or so) to get best results. You can read more about stacking frames at the CelestronNexImage review page.
My Few NexStar Woes
The only issues I've had so far with using the NexStar are listed below:
Issue one will be taken care of with more frequent use, and I've made progress on that front. It's easier to control the telescope now that I've gotten more used to the computerized system.
Issue two, bumping the telescope, can happen when I move the telescope to a different target, and it necessitates me moving my observing position. I sometimes bump a tripod leg, which nullifies my alignment.
Issue three is caused by the tight fit to get ones hands in between the tripod legs to get to the small number of eyepiece storage holes. There's mix of both 1.25 inch and 2 inch diameter holes. I've learned I must be careful not to drop one of my 1.25 inch eyepieces into a 2 inch hole. And my clumsy hands have trouble squeezing into the small space between the the tripod legs, and choosing the proper storage hole in the dark.
I solved issue 3, the awkward eyepiece tray, by placing a much larger eyepiece tray over the original and fastening it to the original tray with 3 bolts. Now I have ample room to put eyepieces with a bigger more accessible surface, and more places for eyepieces. And since I only use 1.25 inch eyepieces, all holes are designed for that size. You can see the modification below:

I certainly recommend getting an AC adapter, because if you happen to go for a NexStar, you'll find that it will only operate on 8 Alkaline batteries for a couple of hours. If you don't have an AC outlet near your observing site, a good alternative is the Celestron Power Tank
I started out using the NexStar exclusively on the AC adapter -- with no batteries in the mount at all. But I found that when I did that, at least a couple times in an observing session the telescope would basically lock up. Apparently the computer either momentarily lost contact with the motors (an error would show up on the hand controller display), or the controller would blink off. As with kicking a tripod leg, this unhappy event always necessitated a realignment.
As I experimented with the mount to determine the source of the glitches, I determined that the power switch was often making poor contact. Eventually I went to the Celestron Spare Parts page and ordered a new switch. Since replacing that, I've had no more problems with the AC adapter powered telescope.
A Handy Hint For The Hand Controller

One thing the previous owner had found out is that when observing, there needs to be some place to conveniently place the hand controller. As the photographs illustrate, the controller does fit nicely into the side of the single-arm mount. But in the dark, getting the controller into its home is cumbersome. The previous owner neatly solved that problem by putting a piece of Velcro on the back of the controller, and the matching piece of Velcro on the top of the base. Even in the dark, it's easy to place the controller on the base, and the Velcro secures it.
And How Are The Optics?
The NexStar 5SE is certainly an optical and mechanical wonder. I started astronomy when I was a teen, and that was decades ago. I never imagined that I would one day be able to afford a fully computerized SCT telescope -- or even just an SCT telescope. But with today's technology, virtually any astronomy enthusiast can likely afford one, if not new, then used as I obtained mine.
All of that computer business, handy though it is, can't make up for a poor optical system. Fortunately, with all of Celestron's experience in producing quality SCT's for all the decades I've been into astronomy, the NexStar telescope computer doesn't have to make up for a poor optical system -- because it has a great optical system.
In fact, one thing that bugs me most is how many ads hawk the NexStar 5SE as
a great beginners telescope. Yet most of the users I read about who
use the NexStar are anything but beginners. They use it because it is a quality
telescope that is portable. Many of the users have bigger telescopes, but the
NexStar 5SE is one of their grab and go
telescopes -- great optics, yet
portable. I get the beginners
angle, it's because the computer driven
mount makes it easy to find targets. But it's far more that a beginners
telescope.
The manual makes a big deal out of the Starbright XLT coatings on the optics, which it says gives much better light transmission and efficiency to the system. As near as I can tell, that isn't all hype. I've made a few comparisons between the NexStar 5Se and my 6 inch F/5 Newtonian telescope. The 6 inch, by virtue of it's larger diameter, should have about a 44% advantage in light gathering power. But when one factors in the Starbright XLT coatings, that diminishes to only about a 30% advantage, just above noticeable. And that's what I've found, the 6 inch advantage is just above noticeable.
A couple of things popped out at me when doing comparisons. One evening I was just sighting in Polaris with the NexStar for alignment purposes, and I noticed an easily visible companion star. I knew Polaris had some companions, but I'd never noticed one so easily before.
On that same evening, the Plato area of the moon was under a good illumination. It's one of my favorite lunar regions, and I've looked at it many times before with each of my other telescopes. But on this occasion, a few of the Plato craterlets jumped out at me. I've hunted for them many times, usually in vane, and here the NexStar threw them in my face. I looked for them in my 6 inch Newtonian, and did see them. But they were more noticeable with the NexStar.
I've looked at a handful of star objects as well. The open clusters I've looked at, particularly M35, M36, M37, and M38 look about the same in both the NexStar 5SE and my 6 inch Newtonian, when viewed at similar magnifications. Likewise the globular cluster M3. With the NexStar, I decided to take advantage of the computerized mount and search for M101. I've never found it before from my moderately light polluted sky, and I hoped that the NexStar would put me on it so I wouldn't have to search and likely miss it. The NexStar did what I needed.
I had to look for awhile, but I didn't touch the controls, I just trusted the NexStar system. After staring for a few minutes, a ghostly apparition appeared -- M101 at last. I was able to find it with the 6 inch as well, but only because now I knew what I was looking for. And it didn't look perceptibly different in the 6 inch.
The NexStar also helped me pick out a number of tiny sparklers around the fuzzball that is M13, the Hercules cluster. It gave me a view of M13 as good, perhaps better, than my 6 inch f/5 Newtonian.
I also examined the double double in the Lyra constellation, near the bright star Vega. The double double is a challenge to most telescopes because one of the doubles in the double pair has little separation, and the two stars are not the same magnitude. In my 60mm telescopes, as good as they are, resolving the closer double is challenging. With my 6 inch f/5 Newtonian, on good nights both doubles are resolvable, but sometimes the difficult one isn't. The NexStar 5SE resolved both pair nicely, with prefect little diffraction images for each star.
One thing that perplexes me about the NexStar 5SE is that I find no comparisons between it and the famous Questar 3.5. It seems that about every type of portable telescope is at some time compared to the gold standard quality of the Questar, including the ETX 90, 80mm to 100mm ED refractors, and many other telescopes. But I don't see the NexStar 5SE compared to it.
Perhaps it seems absurd to compare a 5 inch to a 3.5 inch, though I've seen comparisons of views between a Questar and even a C8 Celestron. So where's the NexStar 5SE comparison?
My conclusion is that the NexStar 5SE has excellent optics, and the contrast is surprising. I have to say that I'm a confirmed believer in the Starbright XLT coatings. The computerized mount works very accurately if I put in my location and time correctly. I definitely recommend it. Comparing it to my ETX 90, the closest thing I have to a Questar, I find the NexStar with it's quality optics and larger aperture outperforms the ETX 90. Images have more contrast, and certainly more stars are visible.
No comments:
Post a Comment