Astrophotos Taken Through A Meade ETX 90
Amateur astronomers often eventually try some astrophotography. The survey results shown below, obtained from over 250 amateur astronomer participants, shows that over half amateur astronomers surveyed at one time or another have taken their own moon pics, and nearly as many have taken planetary pics. Another survey result showed that while film cameras are still used some by amateur astronomers, digital photography is now by far the most popular choice for astrophotography. In addition to showing pics of the moon that I've taken, this web page gives some hints on how to take photographs of the moon and planets.


In 2011 Meade apparently dropped their popular ETX 125 Maksutov telescope, though they kept making a version of the ETX 90. In 2017 Meade re-introduced a new version of the Meade Instruments ETX125 Observer Telescope
Some Photo Hints
Celestron NexImage Astro Camera

One of the easiest ways to take good solar system object photos is with a web camera conversion, like the Celestron NexImage camera. You see a photo of it above, showing a pencil next to it for scale. Note that it is just a web cam CCD in small unit, with a snout on it that is the same size as a 1.25 inch eyepiece. This is so it can easily be inserted into a telescope focuser, with the telescope image then showing up on a laptop screen via the camera controlling software. This is the camera I used with my ETX 90 for taking the photos on this page.
The following moon pics and planet pics give some illustration of what can be accomplished with the compact Maksutov and SCT telescope designs. With their short tube and built in tracking motors and computers, setting them up for solar system photography is relatively easy. Not all of the moon images are representative of the best the telescope can do, but some are very close to that.
First Problem, Getting the Target in CCD FOV
The Jupiter photographs are not as good as I hoped, but again, near the best this scope can do, at least with a digital camera of web cam design. I think to get better Jupiter photos I would need to move to a 3X Barlow to magnify the planet to a greater extent. That may sound simple enough, but it turns out to be a significant challenge to get a planet to show up on the very small field of view of a CCD that results from Barlow lens projection. The higher the magnifaction factor, the more difficult to get the target to show up on the CCD.These images were obtained by first aligning the equatorial mounted telescope with Polaris. This helped the clock drive do a better job, keeping image drift to a minimum. I found that with the digital web cam camera, the moon was an easy target. Even if considerably out of focus initially, when the moon swept through the camera field of view it was noticeable. I could then adjust the focus to get the best image to show on my laptop, which was running the web cam program and presenting the real-time display.
For the Jupiter pics, Mars pics, and Saturn pics, I found that it was best to focus the telescope-camera combination first on something before trying to get the planets into view. I used the moon if it was up, otherwise a streetlamp or something similar at least a block or two away. In this way, when I swept across a planet, it would be at least be noticeable on the computer screen, letting me complete fine focus and take my photographs. If I didn't pre-focus on anything, I found I could sweep past a planet and not even tell that it had passed through the field of view.
Next, Adjust Camera for Best Image
After finding a target, I adjusted the parameters of the web cam to give an optimal image in terms of brightness and contrast. If I had the contrast or brightness too high, some parts of the images would be saturated, and nothing I could do in post processing would recover that. So be sure if you do this you set your camera parameters for an image that has good contrast, but nothing besides the empty space is totally black, and nothing is completely white.Next, and perhaps most difficult, I'd try to get the finest focus. This is difficult when looking at an image on a computer screen. The camera display update rate is a bit slow, and touching a focus knob can cause motion. When the motion subsided, often I couldn't tell if I'd improved the focus or not. Don't rush this step. Unfocused images, like poorly exposed ones, can't be recovered in post processing.
Best to Take Movies and Stack Frames
Best results were obtained by taking movies
through the web cam, rather than taking individual pictures. This allowed plenty of frames for image stacking, which gives far superior results. On some of my earlier outings I didn't get enough images to do that. Try for a minimum of 20 images for stacking, more is better. With a 10 frame per second web cam, that means take at least a few seconds per intended final image.
I now typically take 20 to 30 second exposures, yielding 200 to 300 frames. The Yorick program I use allows me to set a correlation factor used to dispose of frames below some selected limit. I usually end up with around 60 frames that meet the correlation criteria.
Saturn makes a difficult target for smaller telescopes, say less than 6 inch. Not because it is so small, but that it is so far away that it is not that bright. My first Saturn photo was taken at prime focus because of how dim it was when magnified. The result after processing was then enlarged.
Some of these photos turned out very well, including Copernicus, Tycho, and Eratosthenes as examples. I've compared these to about every similar photograph on the web, and have concluded that for the size instrument used, they are top notch. The only images I've managed to find that put some of these to shame are a few taken by 8 inch and larger instruments, and sometimes even these don't seriously shame the ETX 90 efforts. It just shows what a remarkable instrument the ETX 90 is.
The Telescope Used:

Meade ETX Maksutov telescope on pipe tripod with wedge. Attached to the fork mount base with Velcro is a hand controller for the RA motor. It is a simple modification to the controller circuit card, and is indispensable for doing digital photography of solar system targets. The newer computer controlled ETX 90 models already have the necessary controls.
Moon, Aristarchus region

Meade ETX 90 with Celestron NexImage camera and 2x Barlow. Stack of 76 frames. The brightness of the floor of Aristarchus hides details of the crater floor, but Schroter's Valley shows up well.
Moon, Copernicus.

Meade ETX90 With Celestron NexImage Webcam, 2x Barlow, stack of 50 frames. The mountain peaks are well resolved, and some of the roughness of the crater floor to the upper left of the peaks is discernible.
Moon, Alpine Valley.

Meade ETX90 with Celestron NexImage, 2x Barlow, stack of about 60 frames. The fascinating Alpine Valley, near the crater Plato, was well displayed by the position of the terminator in this view.
Moon,Plato region.

Meade ETX90 With Celestron NexImage Webcam, using 2x Barlow, stack of 60 frames. This is one of my favorite lunar regions, and the terminator was just about perfect for a nice view of Plato. Just above Plato is the pitchfork shaped Tenerife Mountain Range
Moon, Straight Range

Meade ETX90 With Celestron NexImage Webcam, using 2x Barlow, stack of about 50 frames. Near Plato, this enigmatic small mountain range is unusually linear.
Moon, Clavius.

Meade ETX9 Celestron NexImage Webcam and 2x Barlow, stack of 50 frames. This big majestic feature is always a treat, with many smaller craters on the floor of the big crater.
Moon, Tycho.

Meade ETX90 with Celestron NexImage Webcam, 2x Barlow. In this closeup view, the resolution of the amazing ETX 90 is evident. Too close for the magnificent system of rays to be seen, this image shows clearly the crater floor and rim, as well as the heavily cratered region surrounding Tycho.
Moon, Albategnius region.

Meade ETX90 with Celestron NexImage, 2x Barlow, stack of about 60 frames. The nearby large crater of Ptolemaeus is also well displayed.
Moon, Eratosthenes.

Meade ETX90 With Celestron NexImage Webcam, 2x Barlow. I've oft strained to see the three mountain peaks on the floor of Eratosthenes, and this image shows them well.
Moon, Purbach region.

Meade ETX90 With Celestron NexImage, 2x Barlow, stack of about 60 frames. Purbach is the large crater at the bottom of the image.
Moon, Bay Of Rainbows.

Meade ETX90 With Quickcam Express Webcam, 2x Barlow, stack of 50 Images. This large feature, near the Plato region, gives testimony to a large impact in a distant past, largely filled in with lava.
Moon, Pallas region

ETX90 With Celestron NexImage, 2x Barlow, stack of about 60 frames. Pallas is the crater near the upper left of the image. It overlays the rim of the larger crater Murchison
Moon, Apennine Mountains Region.

ETX90 With Celestron NexImage, 2x Barlow, stack of about 60 frames. This mountain range forms the southeastern border of Mare I
Moon, Gassendi Crater.

ETX90 With Celestron NexImage and 2x Barlow. While not a region I view often, Gassendi presented itself well on this evening. Seeing, however, was only moderate, allowing me only a so-so image.
Moon Image, Hyginus Region.

ETX90 With Celestron NexImage, 2x Barlow, stack of about 60 frames. In this view, the small crater is seen split by the Hyginus rill.
Moon, Stofler Region.

ETX90 With Celestron NexImage and 2x Barlow, stack of about 60 frames. Stofler is the large crater to the lower left, with part of its rim destroyed by a series of later impacts.
Jupiter, Nov 4, 2010.
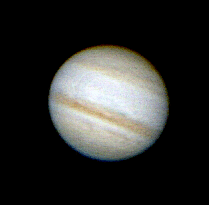
ETX90 With Celestron NexImage, 2x Barlow, stack of 22 frames. In 2010, the SEB did its famous but infrequent disappearing act. This image shows clearly that the SEB is missing.
Jupiter, Nov 5, 2010.

ETX90 With Celestron NexImage Webcam, 2x Barlow, stack of 82 frames. The Great Red Spot shows up well in this image. Normally the GRS is seen on the border of the SEB, which happened to temporally disappear in 2010.
Jupiter, Nov 03, 2001.
ETX90 With Quickcam Express Webcam, 2x Barlow. Above Center And Left of each image is Io's Shadow, Shown Moving In The Successive Images. Note in these older, non-stacked images the SEB is clearly visible.
Saturn, Apr 4, 2012.
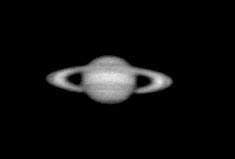
ETX90 With Celestron NexImage Webcam, 2.5x Barlow, stack of 141 frames. With the added sensitivity and resolution of the Celestron NexImage camera, I was able to use a Barlow to boost up the image size for this image. Note that between the 2001 and 2012 images, Saturn had gone through a ring transition.
Mars, 2003 Opposition.

ETX90 with Quickcam Express Webcam and 2x Barlow, stack of 48 frames. This image turned out better than I ever expected, aided in large part with an opposition that presented Mars at its closest approach in decades. Mars was at an apparent size of 25 arc-seconds.
Mars, 2003 Opposition.

Colorized to Mars typical photograph color.
Mars, 2012 Opposition.

ETX90 with Celestron NexImage and 2.5x Barlow, stack of about 60 frames. In 2012, the Mars opposition wasn't nearly as favorable as in 2003. In this image, Mars was only at an apparent size of about 12.5 arc-seconds.
Mars, 2012 Opposition.
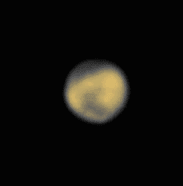
Colorized to Mars typical photograph color.
Mars, 2016 Opposition.

ETX90 with Celestron NexImage and 3x Barlow, stack of about 80 frames. In 2016, the Mars opposition presented an image with an apparent size of about 18 arc-seconds.
Personal Notes
Though the pictures on this web page were taken with a modified web cam, they could have also been obtained with a digital camera mounted behind the eyepiece, or a cell phone. With a digital camera or cell phone, you don't need to haul a computer out to the telescope to control the camera. Below is an image taking with a Fuji digital camera mounted to see through the telescope.

No comments:
Post a Comment