How To Begin Astronomy On A Budget
Do you have a 60mm telescope? Chances are, if you're an amateur astronomer, either new or experienced, you likely either have or had at some time a 60mm refractor telescope.
Are you tired of taking flack for having a 60mm telescope? I'm sure, if you have such a telescope, you're oft reminded by some of your astro-buddies that you need a bigger telescope.
Do you need a bigger telescope?
I'm sure that many of you wonder if that small telescope you bought (or are thinking about buying) will see any details on the moon or planets, or any star objects. Let the above image of Tycho, taken with a 60mm, give you some ease. Rest assured that much of the negative comments you've read about 60mm telescopes is nonsense. Not all, but much.
The truth is that a 60mm telescope on a steady mount is capable of delivering quite good images of the moon and planets, as well as hundreds of star clusters, some galaxies, some nebulae, and many double stars. In fact, one enterprising enthusiast put together a list of telescopes to keep your eye out for, and a challenging list of objects for 60mm telescope users. His site is the The Year Long 60mm Telescope Challenge. Perhaps the more limiting thing about most available 60mm telescopes is the wobbly mounts they come with. Beef up or replace that mount and you'll likely have a fine performing telescope.
I put this web page together to show that even a very modest-sized telescope, if of reasonable quality, can see and even photograph more lunar and planetary detail than you'd likely imagine. I took on the challenge of getting these images through a 60mm f/17 refractor telescope to prove a point. The telescope used is described on the DIY RefractorTelescope page on this site.
I've seen many advice articles on what telescopes beginner astronomers should buy, and while there's always some good points presented, it seems to me that the things that can be viewed through a 60mm refractor are often significantly understated. So I took these images to show not only what you can expect to see with such a telescope, but what you can even photograph if you have the inclination, some time, and a bit (well, maybe a lot) of patience.
If you want to start an astronomy hobby on a budget, and maybe even do a bit
more than just observe objects, let this web page give you some inspiration. I
put this telescope together and constructed a pipe-tripod mount for it, as
described below. You can skip all the preliminary work if you want by simply
purchasing a commercial 60mm to 70mm refractor, such as the Celestron 21062 AstroMaster 70 EQ Refractor Telescope.
The 70mm instrument listed is a bit bigger in aperture than the 60mm telescope I used for the results on this page, so it is capable of even better views and photographs. It's also on an equatorial mount, making the tracking of objects easier. I have a similar 70mm telescope, but without the mount. I use it on my same old pipe-fitting tripod. At 900mm focal length, like my 60mm, the listed 70mm is very well color corrected.
Start With The Tripod Mount And Telescope

I put the telescope above together on a very meager budget, less than $150. The Pipe FittingTripod only cost about $50 and a bit of elbow grease. The mount may look embarrassingly crude, but it is simple to use and rock solid. Click on the indicated link to see how you can make one.
The DIY 60mmRefractor Project only set me back about $125. The telescope is made from new old stock parts, obtained from the sites listed at the DIY 60mm Refractor Project link. Rather then build your own or purchasing a new 60mm telescope, you can cruise Ebay for a classic 60mm of yesteryear, and you'll likely end up with a fine performing telescope for peanuts.
The telescope I made is a 60mm refractor of the old school long focus design, with a focal ratio of f/17. That makes the instrument an excellent performer for lunar and planetary work, even though only 60mm in aperture. If you go shopping for a good planetary-capable refractor, look for one with a focal ratio of f/15 or larger, though they are harder to find. More commonly, you'll find acceptable 700mm focal length 60mm telescopes, which translate to f/11.7 focal ratio instruments. With at least 700mm of focal length, you'll get good color correction and more magnification with any given eyepiece -- a plus for lunar and planetary observing.
If You Want To Take Pictures -- Add A Camera

If you want to use your telescope for more than observing, you can get started inexpensively in a number of ways. The pictures near the end of this web page were taken with a Celestron NexImageastro-camera, which cost me about $100. In the image above you see my Celestron NexImage web cam and Barlow lens inserted into the telescope's focuser.
You can see that when taking photographs, I removed the star diagonal, inserted the Barlow, then inserted the camera. The Barlow doubled the magnification of the telescope to give me higher resolution images.
If I want wider field images, I insert the web cam directly into the focuser, leaving out the Barlow lens.
You can probably get into astrophotography at an even cheaper price. You can make your own Web Cam Astro-Camera as I did. I took the electronics including the CCD out of a Web Cam and mounted it to a 1.25 inch camera adapter. It works exactly like the Celestron NexImage, and might cost you even less. You'll need a bit of construction skill and possibly a camera adapter that has a camera T thread on one end, and a 1.25 inch snout on the other for sliding into a standard telescope focuser.
You can even take moon photographs with just a typical digital camera. The easiest way is to obtain a Cell Phone Telescope Adapter. You can also get some good shots by just focusing the telescope on the moon and holding a digital camera up to the eyepiece, as shown at the bottom of the 60mm RefractorProject. Photographing planets with a digital camera requires a camera that lets you turn off the auto focus and auto exposure features. Frankly, if shooting planets is your desire, you want to go beyond a hand-held camera.
The Celestron web cam came with the handy image stacking program RegiStax. If you make your own web cam astro-camera, you can get RegiStax and install it on your computer. With RegiStax, you can take movies of a few tens of seconds with your web cam astro-camera, then line up and stack the individual frames to get a good average image. This gets rid of much of the atmospheric effects and pixelization caused by the camera.
And Now, Some Photographs
The following photographs were all taken with the illustrated 60mm telescope and the CelestronNexImage web cam. Note that the telescope was mounted on the heavy-duty pipe-fitting tripod. That tripod has neither a clock drive nor slow motion controls. However, it is extremely sturdy and holds the telescope at any given position with absolutely no vibration.
I lightly tapped the telescope in desired directions to make minute adjustments in the pointing angle, then used my laptop to collect film strips (.avi files) with the Celestron NexImage camera. Naturally the target drifted through the field of view as the earth rotated, but the shutter speed of the NexImage was sufficient to capture sharp images on each frame. The fact that each successive frame of a movie was shifted in position was taken care of by processing the files with the RegiStax software program that came with the Celestron camera.
A sturdy mount is most critical for photographing objects at high magnification. You'll do much better with a modest telescope on a solid mount than with a bigger telescope on a wobbly mount.
I used 620x480 resolution for the image capture. In this case, images were aligned and stacked using a program of my own design rather than RegiStax. Why my own program? Mostly because I use Linux as my operating system, and RegiStax is designed to run on Windows.
By choosing a specific area for alignment before stacking, I was able to extract those portions and enlarge them a bit while still achieving good results. For the lunar images, I show both the full-sized stacked images and an enlarged portion. These give a sense of what can be viewed through a good quality 60mm refractor. I think you'll be pleasantly surprised.
The moon images each consist of between 20 and 40 stacked frames. The Jupiter image has about 150 stacked frames. Stacking at least 60 frames is more desirable, but since this telescope was on a non-tracking mount, the field of view and earth rate combination conspired against me, limiting reasonable field moon images to about 40 frames.
Moon, Plato Region

Moon, Plato Region. 60mm f/17 telescope with Celestron NexImage camera. This is one of my favorite areas of the moon, with the big Plato crater and Alpine Valley.
Moon, Alpine Valley

Moon, Alpine Valley, 60mm f/17 telescope with Celestron NexImage camera. Notice the bright crater with ejecta in upper left of image.
Moon, Plato Crater

Moon, Plato crater, 60mm f/17 telescope with Celestron NexImage camera. This image doesn't capture the small craterlets that can sometimes be seen on the crater floor.
Moon, Apennine Mountains

Moon, Apennine Mountains, 60mm f/17 telescope with Celestron NexImage camera.These rugged mountains form the partial rim of the great Mare Imbrium sea. A recent theory suggests that a sizable asteroid impact early in the Moons formation created this circular basin.
Moon, Fra Mauro Region

Moon, Fra Mauro Crater region, 60mm f/17 telescope with Celestron NexImage camera.
Moon, Fra Mauro Region

Moon, Fra Mauro Crater, 60mm f/17 telescope with Celestron NexImage camera. An interesting old crater with a large segment of one wall missing.
Moon, Eratosthenes Region

Moon, Eratosthenes Region. 60mm f/17 telescope with Celestron NexImage camera.
Moon, Eratosthenes Crater

Moon, Eratosthenes crater, 60mm f/17 telescope with Celestron NexImage camera. At times I've struggled to see those 3 mountain peaks in Eratosthenes even with my 6 inch reflector. But here, the 60mm captured them nicely. For scale, Eratosthenes is 36 mi in diameter. See if you can see the 3 peaks on your next opportunity.
Moon, Straight Wall Region

Moon, Straight Wall Region. 60mm f/17 telescope with Celestron NexImage camera.
Moon, Straight Wall

Moon, Straight Wall, 60mm f/17 telescope with Celestron NexImage camera. A feature that's invisible except when the terminator is close by.
Moon, Tycho Region

Moon, Tycho region. 60mm f/17 telescope with Celestron NexImage camera.
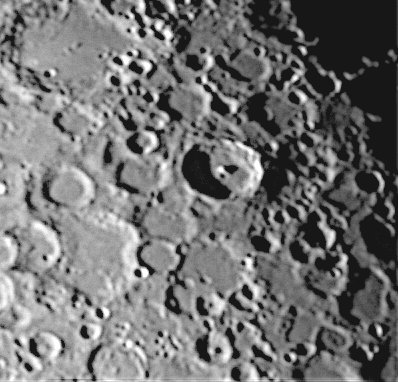
Moon, Tycho Crater

Moon, Tycho crater, 60mm f/17 telescope with Celestron NexImage camera. Notice the small peak next to the central mountain peak. During a full moon, you'll find that Tycho is the center of the greatest bright ray system on the moon.
Moon, Clavius Region

Moon, Clavius region. 60mm f/17 telescope with Celestron NexImage camera. Clavius is a very big crater, and as the image reveals, Clavius has had many impacts on its floor sometime after formation, as well as a couple of impacts on its rim.
Moon, Clavius Crater

Moon, Clavius crater, 60mm f/17 telescope with Celestron NexImage camera.
Jupiter

Jupiter. 60mm f/17 telescope with Celestron NexImage camera. In this inverted image, the NEB (brown belt) is easily seen. You can also just see a shaded region where the SEB usually is visible, but not in this 2010 image when the SEB all but disappeared. Also visible is the NTB and the darkened polar caps (see Observing Jupiter).
Jupiter in B/W

Jupiter. 60mm f/17 telescope with Celestron NexImage camera. This is my best black and white image, stacking about a dozen of the best frames. This is more like what is actually seen through a 60mm telescope.
Summary
You might wonder if stacking images can create more detail than actually is visible? No, it cannot. If the telescope doesn't deliver details beyond a point, stacking won't either. But stacking can minimize the camera and atmospheric conditions like that shown below that would otherwise limit photograph quality.

Can you really see all the detail shown in these photographs with a 60mm telescope? In a word -- yes, if it's a quality one. There are differences between what can be seen in stacked images like these and the actual telescope view. Looking live through a telescope, one can see more detail -- yes, that's more detail. The atmosphere has moments of clearing that give the viewer very crisp views, if only for short intervals, as shown in the movie at left.
On the other hand, by post processing images, one can adjust the contrast to bring out details that may not be easily seen with the eye at the telescope. For example, notice the brown North Equatorial Belt on the Jupiter photograph. Through a small telescope, color such as this isn't perceptible by the eye, though it is through larger telescopes. But the color is there, and the camera picks it up. Through the 60mm eyepiece, the NEB is quite visible, but it looks dark gray instead of brown.
So if your budget or need for portability demand you consider a 60mm telescope, just pick a good one and you'll be happy. Consider browsing eBay for vintage 60mm telescope, many Japanese made. Look for brands such as older Tasco, Sears, Towa, Unitron, Polarex, Mayflower, Jaegers, Edmund, or Monolux. These brands are some of the fine brands made yesteryear, before the 60mm was considered to be primarily a kid's telescope.
No comments:
Post a Comment